

 UTAH EDUCATION NETWORK
- PreK-12 Education
Essentials for Teachers
General Resources
Resources by Subject
- Higher Education
Tools for Higher Ed
Resources and Partners

Resources and services for Utah Higher Education faculty and students such as Canvas and collegEmedia. -
Community
Public Libraries
Parents
Career Ed
- Professional Development
UEN Courses
USBE Courses
Tech Discussions
- UEN-TV
Watch UEN-TV
Information
Local Productions

UEN-TV is operated by the Utah Education Network. Our goal is to educate, engage, and enrich the lives of Utah residents through broadcast programs and services. - Distance Education
On-Demand Support
800-863-3496, opt. 1, opt. 1
Mon-Fri 6:00 AM-10:00 PM
Or e-mail us: ivc-ops@uen.orgTraining Resources
- All Training Resources
- IVC Resources
- CMS Web App (CWA)
- WebEx Resources
- Zoom Resources
- Canvas Resources
Additional Info
Tools

The Utah Education Network (UEN) uses various systems and tools to deliver distance education classes to Utah students. - Network
Tech Services
(800) 863-3496Operations Center
801-585-7440
Staff DirectoryUEN Security Office
801-585-9888
Staff DirectoryTechnical Services Support Center (TSSC)
800-863-3496
Staff DirectoryProjects & Services
Network Groups
Network Tools
- About UEN
Information
- CARES Act
- Information Booklet
- Staff Directory
- Network Map
- Jobs
- Technical Advocates
- Software Licensing
Eccles Broadcast Center
101 Wasatch Drive
Salt Lake City, UT 84112(800) 866-5852
(801) 585-6105 (fax)UETN Governance
 Justin
 Braxton
 Dani
Dani Kayla
Kayla Katie
Katie Matthew
 Rob
Rob Val
ValGraphic Organizer
Summary
This activity will help students learn to make a graphic organizer by using words and phrases already created. They will organize the phrases into a chart based on relationships between them.
Materials
Attachments
Per group:
- butcher paper or poster board
- markers
- glue
- scissors
- phrases(attached)
Instructional Procedures
Attachments
- Copy enough set of words for each group and have students cut them out.
- Explain to student that they will arrange the words into a graphic organizer. Do an example of a simple one with these words. You may wish to run them off and have the students make the organizer or just do it with them.
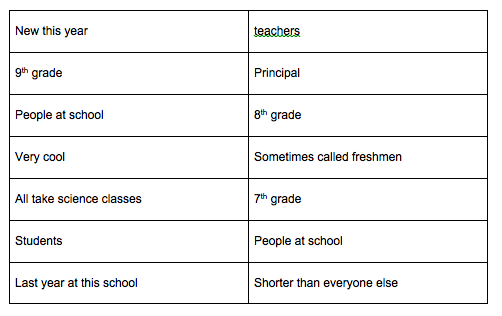
It may look like this:

- Ask students to start in pencil on a piece of paper to organize their charts. They can use additional words or phrases as needed to make the organizer make more sense.
- As the students complete their rough drafts, they can begin using the markers and gluing the terms on their organizer on the large paper.
- As the students to add two additional phrases or words to the organizer using the blank boxes on the table.
- Display the organizers and give students an opportunity to look at the work of the others. Discuss them as a class and have students summarize with a written statement of which groups' work is the easiest to understand and why. It should include an understanding of graphic organizers and chemical and physical properties
Bibliography
Lesson Design by Jordan School District Teachers and Staff.
Updated: 02/05/2018