

 UTAH EDUCATION NETWORK
- PreK-12 Education
Essentials for Teachers
General Resources
Resources by Subject
- Higher Education
Tools for Higher Ed
Resources and Partners

Resources and services for Utah Higher Education faculty and students such as Canvas and collegEmedia. -
Community
Public Libraries
Parents
Career Ed
- Professional Development
UEN Courses
USBE Courses
Tech Discussions
- UEN-TV
Watch UEN-TV
Information
Local Productions

UEN-TV is operated by the Utah Education Network. Our goal is to educate, engage, and enrich the lives of Utah residents through broadcast programs and services. - Distance Education
On-Demand Support
800-863-3496, opt. 1, opt. 1
Mon-Fri 6:00 AM-10:00 PM
Or e-mail us: ivc-ops@uen.orgTraining Resources
- All Training Resources
- IVC Resources
- CMS Web App (CWA)
- WebEx Resources
- Zoom Resources
- Canvas Resources
Additional Info
Tools

The Utah Education Network (UEN) uses various systems and tools to deliver distance education classes to Utah students. - Network
Tech Services
(800) 863-3496Operations Center
801-585-7440
Staff DirectoryUEN Security Office
801-585-9888
Staff DirectoryTechnical Services Support Center (TSSC)
800-863-3496
Staff DirectoryProjects & Services
Network Groups
Network Tools
- About UEN
Information
- CARES Act
- Information Booklet
- Staff Directory
- Network Map
- Jobs
- Technical Advocates
- Software Licensing
Eccles Broadcast Center
101 Wasatch Drive
Salt Lake City, UT 84112(800) 866-5852
(801) 585-6105 (fax)UETN Governance
 Justin
 Braxton
 Dani
Dani Kayla
Kayla Katie
Katie Matthew
 Rob
Rob Val
ValCatching Some Rays
Group Size
Small Groups
Summary
Activities in this lesson help students understand the reasons for the seasons.
Materials
Attachments
-
Centimeter_Grid_Paper.pdf
-
Demeter_Persephone_Readers_Theatre.pdf
-
Seasons_Brainstorming_Chart.pdf
-
Seasons_The_Reasons.pdf
-
Sunray_Bar_Graph.pdf
-
Sunray_Data_Collection_Sheet.pdf
-
Sunray_Line_Graph.pdf
Websites
- Reader's Theater of Demeter and Persephone
- Index cards
- Seasons Brainstorming Chart
- Styrofoam board
- Skewers
- Art paper
- Scissors
- Glue
- Tape
- Thermometers
- Protractor
- Timer
- Sunray Data Collection Sheet
- Colored pencils
- Sunray Line Graph
- Sunray Bar Graph
- Centimeter Grid Paper
- Flashlight
- Science journal
- Seasons: The Reasons
Additional Resources
Books
The Seasons of Arnold's Apple Tree, by Gail Gibbons, ISBN 0-15-271246-1
Sun Up, Sun Down, by Gail Gibbons, ISBN 0-15-282782-x
The Reasons for Seasons, by Gail Gibbons, ISBN 0823411745
The Little Island, by Golden MacDonald and Leonard Weisgard, ISBN 0-440-40830-x
Sunshine Makes the Seasons, by Franklyn M. Branley and Michael Rex, ISBN 069004481X
The Real Reasons for Seasons, Great Explorations in Math and Science (GEMS), ISBN 0- 924886-45-5
Media
Bill Nye the Science Guy. Earth's Seasons; ISBN 1932644342 9781932644340
Organizations
Activities Integrating Mathematics and Science (AIMS) http://www.aimsedu.org/
Background for Teachers
There are many misconceptions about what causes seasons. When people think about Earth's revolution around the sun, many picture a very oval, elliptical shape. Earth's orbit is a slightly elliptical circle. However, the distance between the sun and Earth does not change significantly throughout the year.
Because of Earth's tilt and revolution around the sun, each of Earth's poles tilt toward the sun for part of the year. Consequently, each pole is tilted away from the sun for part of the year. When the Northern Hemisphere is tilted towards the sun, the result is more hours of daylight and more direct, intensified sunlight for our hemisphere. Direct light causes higher temperatures than indirect light. When our hemisphere is tilted away from the sun during winter, the angled sunlight is spread over a greater area, resulting in less intense heat.
Intended Learning Outcomes
1. Use science process and thinking skills.
2. Manifest scientific attitudes and interests.
3. Communicate effectively using science language and reasoning.
Instructional Procedures
Attachments
Invitation to Learn
- The ancient civilization of Greece explained the seasons in a very different way than modern scientists do today. First students will participate in a reader's theater in which the Greek gods tell the story of Demeter and her beautiful daughter, Persephone. The myth tells of the dark god, Hades, kidnapping Persephone and taking her to the underworld to live as his wife. When Demeter hears of her daughter's fate, she mourns so violently that Earth begins to whither and die. It is only upon Persephone's return that Earth blooms to life again. Tell students to pay close attention to how the Ancient Greeks explained the reasons for seasons while reading the myth.
- Tell students that scientists today explain the reason for Earth's seasons in a very different way than the Ancient Greeks did. Provide each student with an index card. Ask students to write what they know (or think they know) about the scientific explanation for seasons on their card. Collect cards and post them on a board that compares accurate scientific information with misconceptions. Students should compare and contrast the Ancient Greek ideas, common modern-day misconceptions, and the real reasons for seasons throughout the unit. Concepts should be reviewed and updated as knowledge grows, changes, and clarifies.
Instructional Procedures
Activity One: Activating Background Knowledge
- As a quick, cooperative learning activity, activate students' prior
knowledge on the concept of seasons, temperature, and seasonal
connections to the students' world. Students should work in
small groups to complete the following Seasons Brainstorming
Chart: (Charts should be cut out and placed into science
journals.)
Seasons Average
TemperatureSigns in Nature People's
ActivitiesWinter Spring Fall Summer
Activity Two: Sunray Catchers
 Explain to students that they will be gathering information
to explain the real reasons for seasons by collecting detailed
temperature data. (This activity should be done outside on a
day with little cloud cover to see the most dramatic results.)
Explain to students that they will be gathering information
to explain the real reasons for seasons by collecting detailed
temperature data. (This activity should be done outside on a
day with little cloud cover to see the most dramatic results.)
- Allow a short amount of time for students to practice reading the thermometers, holding steadily at eye level and not obstructing the bulb with their fingers. Have students examine the scale used on the thermometers. Ask each group of students to stand in a different area of your classroom and report the accurate temperature. Just as the temperatures within your classroom will differ slightly because of exposure to heat sources and movement, so does the temperature on Earth. In order for students to see accurate results, first calibrate all the thermometers by placing them in ice water for 5 minutes. Students will be able to see the thermometer rise significantly when they move the thermometer to their specified location.
Construction of Sunray Tool
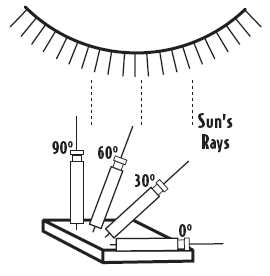
- Explain to the students that they are going to construct a sunray-gathering tool to help model one reason for the seasons. Construct the sunray-gathering tool with students in groups of three or four.
- Begin by cutting a piece of Styrofoam about 12 inches square for each group. (This board will be reused in a subsequent lesson.)
- Now, groups are going to construct holders for the 4 thermometers. Each group will be given a 12" x 18" piece of art paper that has previously been cut in half lengthwise so that it measures 6" x 18". Have students fold their paper in half, and in half again, creating four equal sections that are 41⁄2" x 6". Cut pieces apart. Then, students should fold each piece in half and glue the outer edges, creating a pocket to hold a thermometer. Finally, have the students label the pockets: 0 degrees, 30 degrees, 60 degrees, and 90 degrees.
- Tape a skewer to the back of each pocket. The top of the skewer should line up with the top of the pocket.
- Place a protractor on the horizontal edge of the Styrofoam. Measure with the protractor and push the 30, 60, and 90- degree skewers into the tag board at the correct angle. Slip a thermometer into each pocket, making sure each thermometer bulb is covered. Rest the fourth skewer (0 degrees) on the Styrofoam and use a small piece of tape to hold in place.
Experimenting with the Sunray Catchers
- Have the students take their ray-catcher, science journal, Sunray Data Collection Sheet, four different colored pencils, and the line graphing paper outside and choose a location exposed to the sun. Each student group should choose a different location.
- Students will wait 10 minutes. While students are waiting have them record the procedure for construction of the sunray catcher and their hypothesis for this ray-catching experiment in their science journal.
- After 10 minutes, making sure to keep the bulb covered, students will slide the thermometer out of the holder enough to read it at eye level. Record the temperatures on the data collection chart. Wait and record the temperatures two more times. As students are waiting to read the thermometers at the stated intervals, they should create a four-line graph on the sunray line graphing paper demonstrating the data they are collecting. Use a separate color for each angle. Label the graph key. Students should record any trends or conclusions they observe in their science journals.
- When students return to the classroom, have students use calculators to determine the average temperature for each thermometer. Have the students discuss their findings and observations in small groups and then with the whole group. Discuss the trend shown in the data collected. (The temperature increases as the directness of sunlight increases.)
- Students will finalize findings by creating a bar graph of the averaged data on the sunray bar graphing paper.
- Instruct students to journal in their science notebooks about today's experiment. What was the experiment? (How does the angle of the sun's rays affect temperature?) What was the variable in our experiment? (The angles of the thermometers.) Sketch a model of the experiment. Write a conclusion based on direct and indirect sunrays based upon today's experiment. (More direct light equals more heat; less direct light equals less heat.) What are the limitations of the model we used? (It is not done to scale; we only used four sun angles, etc.)
Activity Three: Putting a Spotlight on Seasons
- Do a quick demonstration on the concept of direct and indirect rays by shining a flashlight with a bright, concentrated beam at your classroom globe. Hold the flashlight at a 90-degree angle and have students describe the shape of the light they see shining on the globe. How would students describe these light rays? (Direct light) Hold the flashlight at approximate 60 and 30-degree angles and have students notice how the shape of the light changes. How would students describe these light rays? (Indirect light) Ask students to infer: What would happen to the heat of the sun's rays if they were spread over a larger area? (The heat would be less intense as it spread out.)
- Have students work in pairs or small groups to compare the area of direct and indirect light. First, students shine light from a flashlight directly onto the centimeter graph paper from 10 centimeters above the paper. One student holds the flashlight as the other student traces around the beam of light shining onto the paper. Students count the squares on the grid paper and estimate the area of the light ray. Then, using a protractor, tilt the flashlight to a 60-degree angle. Make sure the flashlight remains at a constant height above the paper (10 centimeters). Students should trace the light on the paper, and estimate the area. Repeat procedure with a 30-degree angle.
- Last, students should discuss the findings of the spotlight activity with their partner. Ask students to connect this activity with our previous sunray experiment. What do both models show? (Direct and indirect light) Students should write their findings and connections into their science journals.
Extensions
Curriculum Extensions/Adaptations/ Integration
- For advanced learners, allow them to design their own experiment to show the direct and indirect angle of the sun's rays. How would they change or improve the experiment we did in class? Pose this question: How would the seasons change if Earth were NOT tilted on an axis? What would the results of our experiment be if we collected data in the morning, at noon, and near the end of school?
- For learners with special needs, have them take a picture or draw the sunray collection board. Label each thermometer in the picture with the comparative adjectives: warm, warmer, hot, hotter.
Family Connections
- Students and their families should observe the location of the sun throughout the day. Compare the temperatures during the morning, daytime, evening, and night. Where did they notice the sun in the sky during those times?
- Students practice fluency by reading the seasons information to their family.
- Students collect an index card from at least one adult with the adult's explanation of why the earth has seasons. The students should sort and post these cards onto the compare/contrast board showing accurate information and misconceptions.
Assessment Plan
- Instruct students to write on an index card how direct and indirect rays correspond to temperature. These cards should be posted on the compare/contrast board to add to students' understanding of the reasons for seasons.
- Sketch a picture of Earth. Draw the rays hitting the equator directly, and continue drawing sunrays showing the curving of sunlight around the North and South Poles. Notice how short and direct the rays are those strikes at Earth's equator compared to the rays that are longer and must curve when they strike Earth near its poles.
Bibliography
McCoy, J. D., & Ketterlin-Geller, R., (2004). Rethinking instructional delivery for diverse student populations: Serving all learners with concept-based instruction. Intervention in School & Clinic, 40.2, pp. 88-95.
Science issues are a part of our everyday world, but what commonly happens with the teaching of science is students are smothered in abstract and highly theoretical science content. Teachers need to focus on teaching the big essential ideas and concepts, rather than teaching minute details and memorizing facts to regurgitate on a test. One method of doing this is by using hands-on activities that are modeled after real life situations. This helps students focus on concrete applicable science that is interesting and relevant. Another method is simple, inexpensive labs and activities that require little specialized equipment, but focus on key models or experiments that illuminate specific scientific content. This gives students access to the curriculum in a meaningful way.
Updated: 02/05/2018