

 UTAH EDUCATION NETWORK
- PreK-12 Education
Essentials for Teachers
General Resources
Resources by Subject
- Higher Education
Tools for Higher Ed
Resources and Partners

Resources and services for Utah Higher Education faculty and students such as Canvas and collegEmedia. -
Community
Public Libraries
Parents
Career Ed
- Professional Development
UEN Courses
USBE Courses
Tech Discussions
- UEN-TV
Watch UEN-TV
Information
Local Productions

UEN-TV is operated by the Utah Education Network. Our goal is to educate, engage, and enrich the lives of Utah residents through broadcast programs and services. - Distance Education
On-Demand Support
800-863-3496, opt. 1, opt. 1
Mon-Fri 6:00 AM-10:00 PM
Or e-mail us: ivc-ops@uen.orgTraining Resources
- All Training Resources
- IVC Resources
- CMS Web App (CWA)
- WebEx Resources
- Zoom Resources
- Canvas Resources
Additional Info
Tools

The Utah Education Network (UEN) uses various systems and tools to deliver distance education classes to Utah students. - Network
Tech Services
(800) 863-3496Operations Center
801-585-7440
Staff DirectoryUEN Security Office
801-585-9888
Staff DirectoryTechnical Services Support Center (TSSC)
800-863-3496
Staff DirectoryProjects & Services
Network Groups
Network Tools
- About UEN
Information
- CARES Act
- Information Booklet
- Staff Directory
- Network Map
- Jobs
- Technical Advocates
- Software Licensing
Eccles Broadcast Center
101 Wasatch Drive
Salt Lake City, UT 84112(800) 866-5852
(801) 585-6105 (fax)UETN Governance
 Justin
 Braxton
 Dani
Dani Kayla
Kayla Katie
Katie Matthew
 Rob
Rob Val
ValSand, Clay and Humus
Summary
Soil is composed of living, nonliving, and once living components. Students discover these materials as they get their hands dirty in a bucket of soil. Students then study the differences between humus, sand, and clay. They will observe these samples dry, wet, and in settling tubes. This is a great introduction lesson and covers Object 3 A and B extremely well.
Materials
- Dig up a few shovelfuls of soil. Make sure there are some large pieces of leaves, twigs, roots, and rocks included. There should also be earthworms or larvae present for the living component in the soil.
- small tubs at the tables to put the soil in
- white paper at the table for the students to sort living, nonliving, and once living materials
- soil profile page
- sand in a small container at each table
- humus or potting soil in a small container at each table
- clay, Carolina.com, 971610, Clay, Red, 8-lb Bucket, $9.95, place some in a small container at each table, this is not modeling clay but clay found in soil
- plastic spoons
- white paper to place the three soil samples on
- magnifying lenses
- water in a squirt bottle or in a beaker with an eyedropper
- settling tubes, Carolina.com, 971635A, Tube, with Cap, Plastic, 4-1/2 x 5/8 in, Pack of 75, $19.95. Can also use regular test tubes and put your finger over the top as you shake it then let it settle in a test tube rack.
- Student worksheet
- Primary Layers of Soil PDF
-
Background for Teachers
Attachments
Soil is the top layer of most of our earth. Soil is partly made up of decaying plant or animal remains. These are called organic matter or humus and contain the living and once living components of our soil. Soil mostly contains pieces of disintegrating rocks or inorganic matter, water, and air. The differing amounts of inorganic and organic material in a soil sample provide for the different types of soil that we have.

Soil is home to many plants and animals, it provides nutrients and support for plants and crops, helps filter and store water, decomposes waste, and provides natural resources that we depend on.
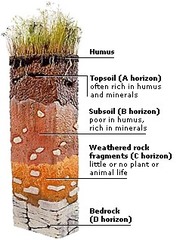
Soil is usually layered. The uppermost layer is called topsoil and this layer contains humus, plant roots, and living creatures. The more humus found in topsoil, the more nutrient rich the topsoil and the better the conditions for growing plants. The middle layer is called subsoil. This contains more clay and less organic matter. Beneath this is a layer of rocks called bedrock. As the bedrock or parent material is broken down it becomes weathered into bits and pieces naturally by water, ice, wind, and plants. These bits and pieces of rock form a large part of our soil.
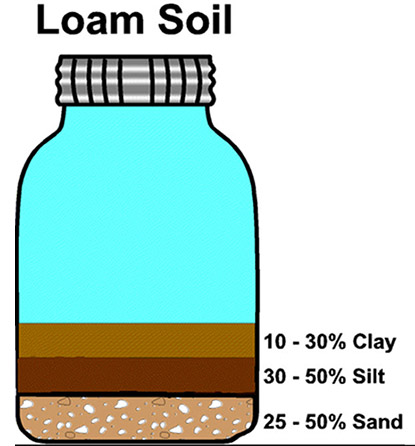
Weathered rock comes in a wide range of shapes and sizes. The largest particles in soil are gravel (larger than 2 mm). The other particles in soil are sand (less than 2 mm), silt (less than 1/16 mm), and clay (less than 1/256 mm). The smaller the particle size the more easily water is held in the soil. The larger particle size the easier it is for water to seep through it and this soil contains lots of air. Roots need water, and air for oxygen. The best texture for plant growth is called loam, which has all three of the different particle sizes (sand, silt, and clay. The loam allows plants to get a sufficient amount of both water and air.
Intended Learning Outcomes
1a. Observe simple objects and patterns and report their observations.
1d. Compare things and events.
3a. Know science information specified for their grade level.
4a. Record data accurately when give the appropriate form and format.
4b. Report observations with pictures, sentences, and models.
Instructional Procedures
Pre-lab discussion: Tell students they are going to get dirty today! Ask students what soil is and what might they find in soil. Have students list the living, nonliving, and once living materials they believe are found in soil. Expand on the list and discuss the soil facts given in the background information section.
Instructional procedure: Have students complete their student sheet as they work through the activity.
II. What is in our soil?
- Have students explore the tub containing the soil. Have them sort through it and find the living, nonliving, and once living components. Have students pull out one example of each living, nonliving, and once living material they find and place it on a white piece of paper. Inform students that air and water are also nonliving components in the soil.
- Look at the diagram of the soil profile. The layer the students were exploring is the topsoil. Below this would be a layer of clay called the subsoil. The deepest layer is bedrock and it is the source of our smaller rocks as it weathers and crumbles. Discuss this soil profile with the students.
II. Describe the differences between dry sand, clay and humus.
- Have the students look at the three samples of soil parts at their table and label them as sand, clay, and humus.
- Have each student place a small scoop of each sample on a white piece of paper. They should place their samples at the points of a triangle on their paper with a large distance between each sample.
- Appearance -- Students should observe the soil parts with the magnifying lens. What is its color? What size granules does it have? How does it look different from the other two samples?
- Texture -- Investigate how it feels between their fingers. Can they roll it into a ball? Which is the hardest? Can you crush it?
III. Describe the differences between wet sand, wet clay, and wet humus.
- Add water with a squirt bottle, drop by drop, until each sample is just moistened. Does the water absorb into the soil part or form a ball above it? They can use a stirrer or their finger to mix each soil part with the water.
- Compare the texture of the wet and dry soil parts.
- Try and roll each wet sample into a ball. If it can make a ball, what does the ball feel like? Only clay can make a ball.
- Take a bit of each wet soil part and try and smear it onto the paper. Can each soil part leave behind a smear? How are the smears different from each other? Only clay can leave a true smear, which demonstrates that it has the smallest granules.
IV. Settling of sand, clay, and humus in water.
- Have each group of students place 1-2 cm of each soil part into a separate test tube. Use the squirt bottle to fill each test tube to the top with water and put the cap on completely.
- Shake the test tube that contains the sand. Look immediately at what happens after they finish shaking the tube.
- Repeat step 2 for the other two samples.
- Let the tubes settle until the end of the class period.
Questions to discuss for settling tubes:
Which sample took the longest to settle and why? The clay has the smallest particles so they take longest to settle.
Why do the tubes look different? The particles have different sizes. Sand has the largest particles and settles fast. The humus has medium size particles and settles next. However, the humus will settle into three layers. A top floating layer, the middle clear water layer, and the layer of dirt particles that sinks in the tube. Finally, the clay has the smallest particles and they will settle slowly over a couple of hours.
Do you notice anything changing in the clay tube over 5 minutes? The clay should settle out in order. You should be able to see the largest particles on the bottom because they settle fastest, then the smallest particles won't settle out until much later and they will be on the top.
Soil can be moved naturally from place to place. In nature, settling is always occurring in rivers and streams. As it rains, soil is swept into nearby rivers and streams and is carried along until it can be deposited in a new place. If it's a slow moving river the small particles can be deposited quickly but in a quick moving river or stream the small particles can be carried very far away from where they started. This settling changes our rivers and the land around it.
Bibliography
Rio Tinto Hands-on Science Curriculum Team
- Ms. Rae Louie -- Administrator, Principal Beacon Heights Elementary
- Emily Mortensen -- Grant writer, teacher outreach, 2nd grade teacher at Beacon Heights Elementary
- Ruth Li -- Curriculum design, K-6 Science Educator at Indian Hills Elementary
- Deirdre Straight -- Curriculum development, K-6 Science Educator at Beacon Heights Elementary
- Tim Rausch -- Website development, Library Media at Beacon Heights Elementary
Updated: 07/08/2022