

 UTAH EDUCATION NETWORK
- PreK-12 Education
Essentials for Teachers
General Resources
Resources by Subject
- Higher Education
Tools for Higher Ed
Resources and Partners

Resources and services for Utah Higher Education faculty and students such as Canvas and collegEmedia. -
Community
Public Libraries
Parents
Career Ed
- Professional Development
UEN Courses
USBE Courses
Tech Discussions
- UEN-TV
Watch UEN-TV
Information
Local Productions

UEN-TV is operated by the Utah Education Network. Our goal is to educate, engage, and enrich the lives of Utah residents through broadcast programs and services. - Distance Education
On-Demand Support
800-863-3496, opt. 1, opt. 1
Mon-Fri 6:00 AM-10:00 PM
Or e-mail us: ivc-ops@uen.orgTraining Resources
- All Training Resources
- IVC Resources
- CMS Web App (CWA)
- WebEx Resources
- Zoom Resources
- Canvas Resources
Additional Info
Tools

The Utah Education Network (UEN) uses various systems and tools to deliver distance education classes to Utah students. - Network
Tech Services
(800) 863-3496Operations Center
801-585-7440
Staff DirectoryUEN Security Office
801-585-9888
Staff DirectoryTechnical Services Support Center (TSSC)
800-863-3496
Staff DirectoryProjects & Services
Network Groups
Network Tools
- About UEN
Information
- CARES Act
- Information Booklet
- Staff Directory
- Network Map
- Jobs
- Technical Advocates
- Software Licensing
Eccles Broadcast Center
101 Wasatch Drive
Salt Lake City, UT 84112(800) 866-5852
(801) 585-6105 (fax)UETN Governance
 Justin
 Braxton
 Dani
Dani Kayla
Kayla Katie
Katie Matthew
 Rob
Rob Val
Val
 Course Introduction
Core Standards of the Course
Complete FCCLA Step One. (http://www.uen.org/cte/facs_cabinet/facs_cabinet10.shtml)
Strand 1
Students will identify careers and products in the apparel design and production industry.

Standard 1
Identify soft goods (i.e., products made with textile and fabrics) in the apparel design and production industry. Examples: Clothing, bags, linens, home furnishings.
Standard 2
Discuss design and career opportunities in the apparel design and production industry (i.e. sewer, apparel designer, gear designer textile designing, product developer, pattern drafting).
Strand 2
Students will be able to recognize basic sewing equipment and its function.
Standard 1
Identify sewing machine parts and their function, safety, and maintenance.

-
Identify the stitch plate, feed dogs, presser foot, presser foot lever/lifter bobbin case, spool pin, upper thread tension, thread take-up lever, foot pedal, hand wheel, stitch length control, and stitch width control.
-
Demonstrate how to properly thread the sewing machine, how to replace a needle, and how to turn the hand wheel toward you when sewing.
-
Identify what a correct stitch looks like and how it is formed (i.e. sewing machine forms a stitch when the upper and bobbin threads interlock).
-
Identify basic machine problems and their solutions.
- Thread jam, Tension issues - Rethread machine, make sure thread is through the tension discs, and take up lever, needle is threaded in the correct direction.
- Correctly rethread bobbin, recognize that most sewing machine problems result from improper threading, incorrect thread choice and poor-quality thread.
- Dull/broken needle - Replace needle, check needle position.
- Incorrect stitch formation - Check tension, check stitch selection.
- Skipped stitches (threaded wrong, bad needle, wrong needle being used)
- Puckered seams (check tension, threading)
- Snagged fabric (tension and needle)
-
Noisy sewing machine. (bad needle, needs to be oiled, threaded problems)
-
Identify needle types and sizes (e.g. universal, sharp, stretch/ballpoint).
-
Use machine manual to demonstrate correct machine maintenance
-
Identify safe sewing procedures (e.g. keep fingers away from needle, avoid distraction, secure loose items).
Standard 2
Identify sewing tools, their function, maintenance and safety procedures.
-
Seam ripper - to remove stiches and open buttonholes.
-
Straight pins - hold layer of fabric together and attach patterns.
-
Shears - to cut fabric.
-
Scissors - to cut paper.
-
Rotary cutter - to cut straight lines.
-
Cutting mat - to protect surface when using rotary cutter.
-
Cutting ruler - to provide a straight edge and protect fingers when using a rotary cutter as well and measure.
-
Seam gauge - a six-inch ruler with an adjustable guide for transferring and repeating measurements.
-
Tape measure - a flexible ruler made of fabric or plastic.
-
Iron - a electrical heated appliance for flattening, creasing and shaping fabric.
-
Pressing cloth - Muslin, Organza, or silicone cloth placed over fabric to prevent marking or scorching when pressing.
-
Marking tools - used to transfer markings from pattern to fabric.
Performance Skills
Students will demonstrate competency in sewing machine use, care, and safety with the completion of a soft good project.
Strand 3
Students will differentiate the characteristics of specific textiles.
Standard 1
Identify the basic fibers and characteristics of manufactured and natural textiles. Recognize that fiber content establishes many of the characteristics of a specific fabric.
-
Identify natural fibers (e.g. cotton, linen, silk, wool) and their characteristics.
- General characteristics: come from plants and animals, moisture absorbent.
- Cotton: plant source
- Pros - absorbent, comfortable, durable, easy to launder, stronger wet than dry.
- Cons - wrinkles, shrinks, mildews.
- Linen: plant source (flax)
- Pros - absorbent, natural luster, quick drying.
- Cons - wrinkles, frays, little stretch, mildews.
- Silk: animal source (silkworm cocoon),
- Pros - absorbent, natural luster, insulating, strong, resilient.
- Cons - degrades and yellows from age and sunlight weaker wet than dry, water marks.
- Wool: animal source (fur)
- Pros - absorbent, strong, elastic, flame resistant, insulating, wrinkle resistant.
- Cons - shrinks when laundered improperly, bleaches with sunlight, damaged by moths.
- Cotton: plant source
- General characteristics: come from plants and animals, moisture absorbent.
-
Identify manufactured fibers and their characteristics.
- General characteristics: made from chemical processes (some made from natural elements mixed with chemicals while other are made completely from non-natural substances)
- Nylon: Chemical sources.
- Pros - strong, water repellent, colorfast, abrasion resistant.
- Cons - frays easily, non-recyclable.
- Polyester: Chemical source.
- Pros - good shape retention, easy to launder, wrinkle resistant, colorfast, blends well with other fibers.
- Cons - retains oily stains, pills, builds static.
- Rayon: Cellulose source.
- Pros - soft and comfortable, drapes well, blends well with other fibers, dyes well.
- Cons - shrinks, poor shape retention, wrinkles, dry clean only.
- Spandex: Chemical source.
- Pros - very elastic, adds stretch when blended with other fibers, resistant to oils and outdoor elements. (sun, sea and sand)
- Cons - shrinks, damaged by heat, can be difficult to sew.
- Bamboo: Cellulose source
- Pros - soft, strong, water absorbent, renewable.
- Cons - wrinkles, takes longer to dry and yellow with time.
- Nylon: Chemical sources.
- General characteristics: made from chemical processes (some made from natural elements mixed with chemicals while other are made completely from non-natural substances)
-
Identify advantages of blended fibers used in fabrics.
Standard 2
Classify the distinction between the types of yarns.
Standard 3
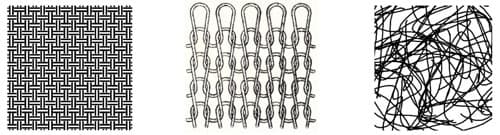
Examine the construction of fabric.
-
Identify the characteristics of woven, knit and non-woven/felted fabrics.
-
Identify the correct fabric for a project.
Performance Skills
Create a fabric file. with a fiber, yarn, fabric, (woven, knit, non- woven). Include example of manufactured and natural fibers.
Strand 4
Students will implement pre-construction skills at the introductory level.
Standard 1
Identify the information found on a commercial pattern envelope.
-
Identify important information on the pattern envelope.
- body measurements & corresponding pattern size
- suggested fabrics
- notions (refers to all the supplies that will be needed to complete a project (i.e. elastic, thread, buttons, bias tape, zippers, trims)
- yardage requirements differentiate 45 and 60" width
- finished garment measurements
- technical flats - black and white sketch of front, back and detailed views
Standard 2
Identify information found on the guide sheet.
-
pattern pieces (i.e. line sketches of each pattern piece used in the garment are arranged and numbered for easier reference)
-
layout diagrams (diagrams suggesting placement of pattern pieces on fabric)
-
sewing instructions
-
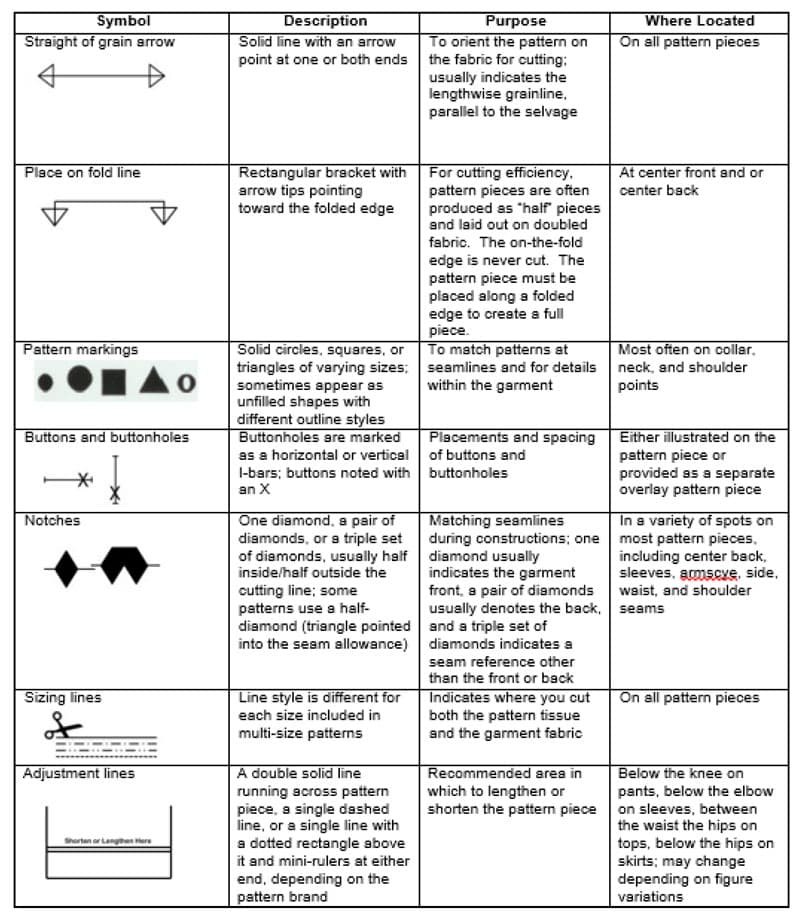
glossary terms and symbols legends
-
seam allowances
Standard 3
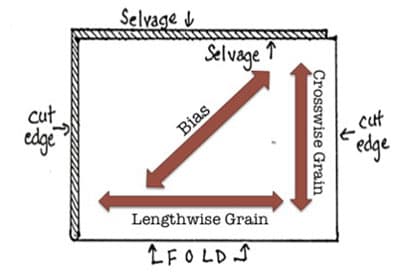
Identify the terminology of fabrics.
-
Selvage: tightly woven finished edge of fabric formed by the crosswise yarns.
-
Warp/lengthwise grain: grainline that is parallel to the selvage commonly referred to as straight of grain.
-
Weft/crosswise grain: grainline that runs; perpendicular to the selvage typically the cut/raw edge.
-
Bias: 45-degree angle to the selvage; has stretch.
Standard 4
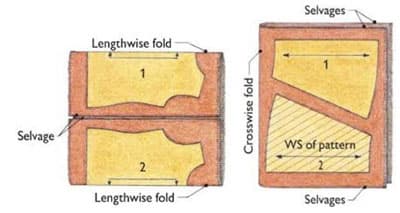
Prepare pattern for layout and cutting.
Standard 5
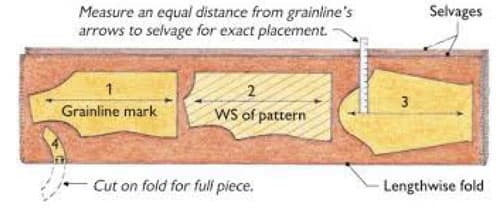
Demonstrate correct placement of pattern pieces on the fabric.
-
A project does not hang properly if the fabric is off grain.
-
Check for directional print and nap (has a definite top and bottom). A fabric with a nap, pile, or directional print needs a one-way layout.
-
Follow suggested layout.
-
Fabrics with asymmetrical prints or weaves need to be cut out in a single layer.
Standard 6
Correctly position, secure, and cut out the fabric pieces.
-
Place pattern pieces according to grainline and place-on-fold pattern symbols.
-
If using pins or weights, space and position pins inside cutting line. Place pins closer together on curves to secure the fabric.
-
Select and use appropriate cutting tools. Use shears to cut out fabric. Hold shears perpendicular and in contact with the cutting surface.
-
Mark notches.
-
Keep pattern pieces as flat as possible, cutting around the pattern piece rather than moving it.
Standard 7
Transfer pattern markings after cutting and before removing pattern pieces from fabric.
-
Select and use appropriate marking tool for fabric mark on the wrong side of the fabric.
- Air soluble pens disappear with exposure to air within a few days.
- Water soluble pen markings disappear by applying a damp cloth to the fabric.
- Chalk makes a nice straight line and is easily removed.
- For tracing wheel and paper, choose the lightest color paper that is visible on the fabric. Position colored side of paper on wrong side of fabric or between two fabric layers. Roll tracing wheel over pattern marking, use a ruler for long straight lines.
- Insert straight pins vertically through the pattern tissue and fabric at the markings and the mark the fabric on the wrong side at the pin location.
Performance Objective #4
Construct an apparel project (pajama pants, lounge/"joggers" pants, elastic or drawstring shorts, basic A-line skirt, basic T-shirt, basic blouse, etc.) using the correct pattern size based on body measurements and finished garment measurements.
Strand 5
Students will utilize construction techniques at the introductory level.
Standard 1
Define and demonstrate the following construction terms:
-
Basting stitch: Long, temporary stitch. Set the machine for the longest stitch possible; no backstitching; baste within the seam allowance, close to but not on the seamline.
-
Back stitch: Stitching a short distance to reinforce stitching in a seam. If available, you may use your machine's "fix" function to lock the stitches at the beginning and end of the seam.
-
Pivot: Technique to stitch a corner. Stitch to the corner marking. Leave the needle in the fabric and lift the presser foot. Turn the fabric. Lower the presser foot and continue stitching.
-
Trimming: Trimming means to cut off part of the seam allowance evenly to reduce bulk. Trim away 3/8 of an inch of fabric along the full length of the seam. This will leave a �-inch seam allowance. Corners of garment pieces are trimmed by cutting diagonally across the corner. Be careful not to cut through the stitching.
-
Clipping and notching a seam allowance makes them more flexible.
-
Grading/Layering is done on enclosed seams where the layered seam allowances create excess bulk. To grade a seam allowance, trim the side closest to the outer portion of the garment to 1/8"-3/16", then trim the other allowance 1/4"-3/8". Reinforce stitch: Smaller length stitching that make a seam stronger (12-14) stitches per inch). Reinforcement stitching is used in places like crotches and corners. A second row of stitching to make a seam stronger. This type of reinforcement stitching is used in places like armholes.
-
Top stitch: Topstitching is a row of evenly spaced straight stitches visible on the rightside of a garment, typically aligned parallel to an edge or a seam. Two functions are to anchor layers of fabric together, and to accent an edge as a finishing detail.
-
Right sides together (RST): Fabrics are placed right sides together when sewing a seam allowance.
Standard 2
Examine and select correct thread for apparel design and accessory projects.
Standard 3
Identify and construct standard seam allowances and seam finishes.
-
Seam allowance is the area between the cut edge of the fabric to the stitching line.
-
Standard seam allowance for commercial pattern is 5/8 inch.
-
Identify 1/4 (approx. the edge of the presser foot), 3/8, 1/2, 5/8, and 3/4-inch seam allowance guidelines on the needle stitch plate.
-
A seam finish is applied to the raw fabric edges, used to prevent raveling/fraying, improves product quality and durability.
-
Identify terms: pinked, zigzagged and clean finished.
Standard 4
Press garment correctly.
-
Press as you sew (never sew over a seam that hasn't been pressed).
-
Pressing is an up and down motion; ironing is a sliding motion.
-
Use correct temperature for fabric/fiber content
-
Use steam/moisture if appropriate
-
Use pressing cloth to prevent scorching and/or shine marks.
Performance Skills
Construct a soft good project using a commercial pattern.
Performance Skills
Complete a minimum of 8 of the follow construction skills.
-
Accurate seam allowance
-
Seam finish - zig zag
-
Seam Finish - Clean Finish
-
Casing (1/4" wider than elastic or draw cord)
-
Basting stitch
-
Backstitch
-
Machine stitched hem
-
Buttonhole
-
Attach a button
-
Hand stitch - (blindstitch, hemstitch, slipstitch, whipstitch or ladder stitch)
-
Pivot
-
Reinforced stitching